
The best window bird house for most backyard birders is a suction-cup or bracket-mounted nest box with a 1.5-inch (38 mm) entrance hole, made from 3/4-inch untreated cedar or pine, with drainage holes, ventilation slots near the roof, and a hinged side for clean-outs. That single setup works for Eastern Bluebirds, Tree Swallows, chickadees (with a slightly smaller 1 1/8-inch hole swap), and House Wrens, the cavity-nesting species most likely to use a box you put up this season.
Best Window Bird House: Complete DIY, Mounting & Care Guide

Maya Thompson
26 Jul 2026
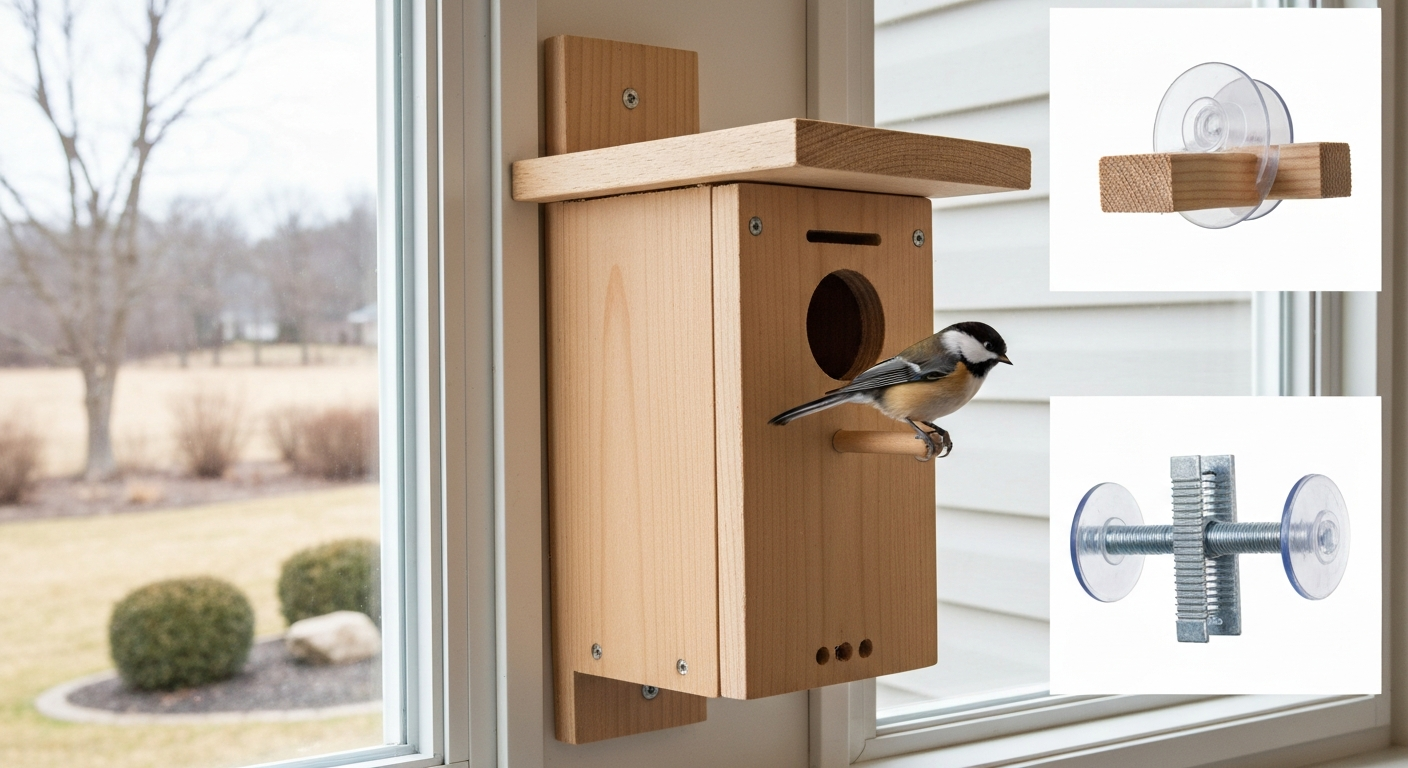
TL;DR: Best window bird house by use case
| Use Case | Best Option | Key Spec |
|---|---|---|
| Watch nesting up close from inside | Interior-viewing acrylic-front box, suction-mounted to glass | Entrance 1 1/8–1 1/2 in; opaque roof shields chicks from light |
| Small yard, no pole space | Exterior bracket box on window frame or wall | 3/4-in cedar; bracket screwed into siding, not glass |
| Open yard, bluebird or swallow trail | Pole-mounted box, 4–6 ft high on smooth metal pole + baffle | Floor 4–5 in sq., entrance 1.5 in (38 mm) |
| Budget build / recycled materials | Reclaimed solid wood box, hardware-cloth predator guard | Avoid treated lumber; use untreated pine, cedar, or oak |
| Remote monitoring | Camera-integrated box or add-on nest camera | Run cable outside; keep interior unlit during incubation |
What a window bird house actually is (and who this guide is for)
A window bird house is a nest box designed either to attach directly to a window pane via suction cups, to mount on the exterior window frame or adjacent siding with a bracket, or to sit inside on a windowsill with a viewing panel facing inward. The term covers a genuinely diverse category: a simple suction-cup cedar box for wrens, an acrylic-front interior viewing box, or a proper nest box on a nearby pole that you can watch from your window. This guide is written for backyard birders who want to attract cavity-nesting species, beginner DIYers who want straightforward build plans, apartment or townhome residents with limited yard space, and anyone who wants to see eggs and chicks without disturbing the nest.
I've focused the advice here on North American species (with a short UK/Europe note) and on boxes that actually serve the bird's welfare, not just the viewer's experience. The Cornell Lab's NestWatch 'right box, right place' framework runs through everything here, because a pretty box in the wrong spot, with the wrong hole size, helps no one. Nest Box Placement - NestWatch (Cornell Lab of Ornithology) lists common backyard cavity-nesters (bluebirds, swallows, chickadees, titmice, nuthatches, wrens, small woodpeckers, and screech‑owls) and emphasizes using the 'right box, right place' to target species.
Why window bird houses are worth it (and what to keep in mind)
Providing nest boxes genuinely supplements cavity availability, especially in suburban and urban areas where dead trees (snags) are routinely removed. Eastern Bluebirds, Tree Swallows, chickadees, titmice, nuthatches, and House Wrens all evolved to nest in natural tree cavities, and all of them will readily adopt a well-built, well-placed box. NestWatch data from thousands of monitored boxes across the U.S. confirms that appropriate boxes in appropriate habitat consistently attract target species and produce fledglings.
Window mounting specifically adds a conservation layer: when you can see the box from indoors, you're far more likely to notice a House Sparrow takeover early, spot a failed nest that needs cleaning, or catch a predator at the entrance before eggs are lost. That visibility translates directly into better outcomes for the birds. The trade-off is that window-mounted boxes are physically smaller and harder to predator-proof than a pole-mounted box with a stovepipe baffle, so you need to think carefully about your site before committing.
- Supplement lost natural cavities in yards where snags have been removed
- Allow close, low-disturbance observation that builds genuine ecological awareness
- Enable early detection of nest parasitism by House Sparrows or European Starlings
- Provide a practical entry point for NestWatch citizen-science monitoring
- Work in spaces too small or exposed for a traditional pole-mounted box
One honest caution: window glass causes bird strikes. If you're placing a box on a window that birds already fly toward, treat the surrounding glass with ultraviolet-reflective film or exterior tape patterns (2-inch horizontal strips spaced 4 inches apart) to reduce collision risk. The box itself won't increase strikes, the bird using it will be approaching slowly and intentionally, but the adjacent glass still poses a hazard to other birds in the yard.
The three types of window bird houses and when to choose each
Suction-cup mounted boxes
Suction-cup boxes attach directly to the glass pane with two or more heavy-duty suction cups (look for cups rated to hold at least 5–6 lbs when loaded with nest material). They're the most visible from indoors and give you the closest view of nesting activity. The downside is weight capacity: a proper 3/4-inch cedar box loaded with a nest and a sitting female will test most suction cups over a full season. I've had better luck with boxes that back the suction cups with a small wooden ledge resting on the windowsill, which offloads some of the vertical stress. These work best for wrens and chickadees, smaller, lighter species. Use a 7/8–1 1/8-inch entrance hole for wrens and a precise 1 1/8-inch hole for chickadees. Suction boxes don't suit bluebirds or swallows well: those species prefer more open, exposed sites with clear flight lines, not a close-set window frame.
Exterior bracket-mounted boxes
A bracket-mounted box screws into the exterior window frame, siding, or a dedicated wood block mounted beside the window. This is the most structurally reliable window-mount option and allows you to use a properly sized, full-weight cedar box. You can position it so the open side of the box faces slightly away from the window (giving birds a clear approach path) while still being fully visible from indoors. Mounting height on a bracket can realistically reach 5–8 feet on a standard two-story house, which is within the preferred range for bluebirds and swallows if the surrounding habitat is open. Always pre-drill into solid framing, not just siding foam, and use exterior-grade stainless or galvanized screws.
Interior viewing boxes
Interior viewing boxes sit inside the window or are mounted so that one transparent panel (usually acrylic or tempered glass) faces inward toward the room. The nest cavity itself remains outside or within the wall cavity, and the viewing panel is normally covered by a dark sliding door or blackout flap that you open briefly for observation. This design requires the most careful installation but delivers an unbeatable view. The interior panel must block light during most of the day, chicks in an excessively bright cavity suffer heat stress and are more vulnerable to predators with line-of-sight through the glass. This type is best for a dedicated installation in a garage, workshop, or shed window where light and temperature can be controlled. It's not a casual DIY project: you'll need to cut or modify the window frame, seal gaps, and ensure the exterior entrance faces an appropriate habitat.
Species dimensions and entrance hole guide
Getting the entrance hole right is the single most important specification. Too large and European Starlings (which need at least 1.5 inches/38 mm) will take over; House Sparrows can squeeze through holes as small as 1 1/4 inches. Too small and your target species simply won't enter. The table below draws on NestWatch, Pennsylvania State University Extension, Oregon State University Extension (EC 1556), and RSPB/BTO guidance for UK species.
| Species | Floor (inches) | Interior Depth (inches) | Entrance Hole | Mount Height | Habitat Notes |
|---|---|---|---|---|---|
| Eastern Bluebird | 4–5 sq. | 8 | 1.5 in (38 mm) | 4–6 ft on open pole | Open fields, meadows, sparse shrubs |
| Tree Swallow | 4–4.5 sq. | 8–10 | 1.5 in (38 mm) | 6–15 ft, near water | Open areas; pairs compete for sites |
| Black-capped / Carolina Chickadee | 4 sq. | 7–9 | 1 1/8 in (28 mm) | 6–15 ft | Woodland edge; keep hole ≤1 1/4 in to exclude sparrows |
| Tufted Titmouse | 4 sq. | 8–10 | 1 1/4 in (32 mm) | 6–15 ft | Deciduous woodland edge |
| House Wren | 3.5–4 sq. | 6–10 | 7/8–1 1/8 in (22–28 mm) | 4–10 ft | Near dense brush or shrubs |
| White-breasted Nuthatch | 4 sq. | 8–10 | 1 3/8 in (35 mm) | 12–20 ft | Mature deciduous or mixed forest |
| Eastern Screech-Owl | 8 sq. | 12–15 | 3 in (76 mm) | 10–30 ft | Woodland, suburban trees |
| Blue Tit (UK) | 4 sq. | 6–8 | 25 mm (1 in) | 6–15 ft | Gardens and woodland edge |
| Great Tit (UK) | 4 sq. | 6–8 | 32 mm (1 1/4 in) | 6–15 ft | Gardens; BTO 'universal' size for most small UK hole-nesters |
| Starling (UK) | 6 sq. | 10–12 | 45 mm (1 3/4 in) | 10–20 ft | Open farmland or large gardens |
Acceptable tolerance on entrance holes is approximately plus or minus 1/16 inch for small species and 1/8 inch for larger ones. Managing Habitat for Eastern Bluebirds - Penn State Extension notes acceptable entrance-hole variances of roughly ±1/16–1/8 inch and recommends keeping holes below 1.5 inches (38 mm) to help exclude starlings. Drill with a sharp spade or Forstner bit and sand lightly, rough edges don't benefit birds and can catch feathers. For the UK, the BTO recommends 32 mm as a practical 'universal' size if you're not targeting a specific species, covering Great Tits, Pied Flycatchers, and several other garden nesters.
What to look for in a ready-made window bird house
If you're buying rather than building, the market ranges from well-engineered boxes from wildlife-focused suppliers to lightweight novelty items that won't survive a single season. Here's how to read a product before you buy it.
Material and construction
Look for 3/4-inch (18 mm) solid wood walls, western red cedar, exterior-grade rough-sawn pine, or Douglas fir. Thin hobby plywood (under 1/2 inch) warps, splits at fastener points, and offers almost no thermal buffering on hot days. Avoid boxes with interior paint, varnish, or any finish that could off-gas in a closed cavity. Exterior surfaces can be painted or stained with water-based exterior paint in a muted, natural colour, but interior walls should be raw and rough-textured so nestlings can grip them when climbing toward the entrance. Never buy a box made from CCA-treated lumber: the U.S. EPA has documented concerns about chromated copper arsenate for residential animal-contact applications, and authoritative extension guides explicitly advise against it for nest boxes.
Drainage, ventilation, and roof
- Drainage: at least four 1/4-inch holes or a slightly recessed floor (floor set 1/4 inch above the bottom edge) so rainwater doesn't pool
- Ventilation: 1/4-inch gaps or slots between the roof and the top of the side walls, or small vent holes drilled near the top of each side wall — critical on south- or west-facing boxes in summer
- Roof overhang: at least 1 inch beyond the front face to shade the entrance hole and shed rain
- Clean-out door: a hinged or pivoting side panel that opens fully; you cannot sanitize a box with a fixed floor
Predator guards on ready-made boxes
A 'guardian plate' or metal hole guard (a 1/4-inch steel or aluminum plate matching the entrance diameter, recessed flush) makes it much harder for a raccoon to enlarge the opening or reach inside. Some quality ready-made boxes include a deep entrance block (1.5–2 inches thick) that functions as a predator guard by extending the distance between the outside surface and the cavity interior. For suction-cup or bracket window boxes, where a raccoon can brace against the frame, this deep-block design is especially valuable. Check that the guard plate is stainless or galvanized, zinc-plated mild steel rusts through in two to three seasons.
DIY window bird house: step-by-step build for a wren or chickadee
This is my go-to beginner build: a bracket-mounted cedar box sized for House Wrens (with a simple hole-plate swap to suit chickadees). It uses one 6-foot length of 1x6 cedar (which mills to 3/4 x 5.5 inches), a handful of 1 5/8-inch exterior screws, a 1-inch or 1 1/8-inch spade bit, and about 90 minutes of shop time.
Materials and tools
- One 6 ft length of 1x6 untreated western red cedar or pine (actual 3/4 x 5.5 in)
- 1 5/8-in exterior-grade coarse-thread screws (18–20 screws)
- One 1-in or 1 1/8-in spade or Forstner bit (1-in for wren, 1 1/8-in for chickadee)
- Tape measure, pencil, speed square
- Handsaw or circular saw
- Drill/driver
- Sandpaper (80 grit), safety glasses, hearing protection
- Optional: exterior water-based stain or paint for outside surfaces only
Cut list
| Part | Dimensions | Qty | Notes |
|---|---|---|---|
| Floor | 4 x 4 in | 1 | Notch corners 3/8 in for drainage |
| Front wall | 4 x 9 in | 1 | Entrance hole centered 1.5 in from top |
| Back wall | 4 x 12 in | 1 | Extra length for mounting screw clearance |
| Side walls (tapered) | 5.5 in wide; 9 in tall at front edge, 10 in at back | 2 | Taper provides roof slope |
| Roof | 6.5 x 7 in | 1 | Overhang 1 in front, 0.5 in each side |
- Cut all pieces to dimension. Keep the back wall slightly taller (12 in) so you have 2–3 inches of bare board above the roof line for mounting screws into the window frame or siding.
- Drill the entrance hole in the front wall first: center it horizontally, position it 1.5 inches down from the top edge. Use a spade or Forstner bit at low speed to avoid tearout. Sand the inside edge smooth.
- Drill four 1/4-inch drainage holes near the corners of the floor, or notch each corner at 3/8 inch with a saw.
- Assemble the floor to the back wall first, flush at the bottom. Use two screws; pre-drill to prevent splitting.
- Attach the two side walls, checking for square as you go. Leave a 1/4-inch ventilation gap at the top of each side wall before the roof sits on — do not close this gap with caulk.
- Pivot-mount one side wall with two screws top and bottom, placed so the entire bottom half of that wall swings open on the top screws when you remove the bottom screws. This is your clean-out door.
- Attach the front wall. Double-check your entrance hole diameter with a drill gauge or caliper before finalizing assembly.
- Screw the roof to the top, ensuring a 1-inch overhang at the front. Do not caulk the roof-to-wall joint — leave it slightly open for additional ventilation.
- Sand all exterior edges lightly. If finishing, apply one coat of water-based exterior stain to outside surfaces only. Let cure 48 hours before installation.
- Mount on the exterior window frame by driving two 2.5-inch exterior screws through the back wall extension into solid framing behind the siding. Confirm the entrance hole faces away from direct afternoon sun in hot climates.
Timing your installation by region and species
NestWatch is emphatic: get your boxes up before breeding begins, not after. Eastern Bluebirds in the southern U.S. (Zones 7–9) can begin investigating nest sites as early as late February. In the mid-Atlantic and Midwest (Zones 5–6), March is the target. In northern states and Canada (Zones 3–4), mid- to late March still gives birds enough time to discover and claim a box before serious nest-building starts. A box put up in May, after territories are set, will often sit empty all season. The practical rule: if you're in the northern U.S. or Canada, February is not too early to install. Clean out last year's nests by late January so the box is ready.
| Region | Install By | Key Species Timing |
|---|---|---|
| Southern U.S. (Zones 7–9) | Mid-February | Bluebirds prospecting by late February; swallows arriving March |
| Mid-Atlantic / Midwest (Zones 5–6) | Early March | Bluebirds by mid-March; chickadees scouting February–March |
| Northern U.S. / Southern Canada (Zones 3–4) | Mid-to-late March | Tree Swallows arrive April; wrens May |
| Pacific Northwest | Early March | Bewick's Wren and chickadees start early in mild years |
| UK / Northern Europe | February | Blue Tit and Great Tit begin nest-building from late February |
After breeding season ends (typically by mid-August for most small species in North America), clean the box out completely: remove all nesting material, scrub with a stiff brush and a 10% bleach solution, rinse thoroughly, and allow to dry fully before closing it up. This removes parasites, blown fly larvae, and bacteria that can reduce next-season success. Leave the box open or remove the clean-out panel over winter to prevent mice from roosting in it unless you're specifically providing winter roosting habitat.
Predator-proofing your window bird house
Raccoons and house cats are the primary predators at window-mounted boxes. A raccoon can reach 4–5 inches into an entrance hole if it can brace against the box exterior, and a determined one will enlarge a wooden hole with its claws. Here's what actually works, ranked by effectiveness.
- Deep entrance block: a block of wood 1.5–2 inches thick with the entrance hole drilled through it, attached to the front of the box, physically extends the tunnel so a raccoon cannot reach the nest floor from outside.
- Metal hole guard plate: a 16-gauge steel or aluminum plate, flush-mounted, prevents claw enlargement of the entrance. Available as hardware or cut from sheet metal with tin snips.
- No perch below the hole: remove any dowel or platform below the entrance — it helps predators, not cavity nesters, who don't need a perch to enter.
- Placement away from launch points: position the box so no tree branch, fence, or roof surface is within 8–10 feet horizontally that a cat or raccoon could jump from.
- Hardware cloth cone: for bracket-mounted boxes, a cone of 1/2-inch hardware cloth stapled around the mounting bracket and angled downward deters climbing.
For pole-mounted boxes (covered in the next section), NestWatch and extension bulletins consistently rate a smooth metal or PVC pole combined with a commercially available stovepipe or conical baffle as the single most effective predator deterrent available. The pole must be smooth (no footholds), and the baffle must be at least 18 inches in diameter and mounted 4–5 feet above the ground.
Pole-mounted boxes: how they compare to window mounting
A pole-mounted nest box is not a window bird house in the strict sense, but if your goal is to watch nesting birds from a window, a pole-mounted box positioned 10–20 feet from the house in clear sightline works beautifully and gives the birds far better security. Penn State Extension and NRCS bluebird trail guidelines specify a 4–6 ft mounting height on a smooth metal or EMT conduit pole for bluebirds, with the entrance facing away from prevailing winds and toward open foraging habitat. This setup is simply not achievable on a window frame, so if you're targeting bluebirds or Tree Swallows, a pole mount is the honest recommendation.
| Feature | Window-Mounted Box | Pole-Mounted Box |
|---|---|---|
| Best species | Wrens, chickadees, small titmice | Bluebirds, Tree Swallows, nuthatches |
| Predator protection | Moderate (deep block + metal plate) | Excellent (smooth pole + stovepipe baffle) |
| Viewing from house | Excellent (close, direct) | Good (10–20 ft, binoculars helpful) |
| Installation effort | Low to moderate | Moderate (post setting or ground anchor) |
| Habitat flexibility | Limited by window location | High (position anywhere in yard) |
| Camera integration | Easy (short cable run through window) | Requires weatherproof cable route |
| Suitable for apartments/rentals | Yes (suction or light bracket) | Unlikely (pole anchor requires ground) |
If you have the yard space and can get a pole into the ground, mount a pole box for bluebirds and add a smaller suction or bracket box at the window for wrens. The two setups complement each other well and target different species in different habitat niches. Guides on choosing the best bird house pole and the best nest bird house cover pole hardware and species-matching in more depth and are worth reading alongside this article.
Camera and smart-home integration
Adding a camera to a window bird house is increasingly practical, and it makes monitoring much less disruptive to the birds. The key rule is to keep the camera small, position it in the upper rear corner of the box looking down and forward toward the entrance, and run the cable out through a 1/4-inch hole in the back wall, sealed with a weatherproof grommet. Never use interior lighting: a red LED is sometimes marketed as 'bird-safe' but there's no solid evidence that cavity-nesting species are comfortable with it, and heat from any bulb raises interior temperature. Natural light entering through the entrance hole is enough for a decent low-light camera sensor.
For window boxes, you have the option of running a USB or PoE cable directly through the window frame into a laptop or network switch indoors, which is much simpler than a weatherproof outdoor cable run to a pole box. Some birders integrate a smart nest box (with built-in PIR sensor, automated alerts, and cloud streaming) for convenience, though the underlying nest-box construction standards remain the same: proper wood, dimensions, ventilation, and clean-out access. Smart bird house options are worth comparing if live streaming or automated nest monitoring is a priority. For a concise comparison of features and models useful for live streaming and automated monitoring, see our guide to the best smart bird house.
Building from waste and recycled materials
A well-built nest box from reclaimed materials can be just as effective as a purpose-bought one, sometimes better, because salvaged old-growth cedar or pine is often denser and more rot-resistant than new plantation lumber. For step-by-step plans and creative ideas using reclaimed and waste materials, see the best out of waste bird house guide for practical project examples. The critical filter is chemical safety: never use wood from old decking, dock boards, or industrial structures that may have been treated with CCA (chromated copper arsenate) or pentachlorophenol. CCA-treated wood is typically greenish-brown and has a slightly metallic smell when cut; when in doubt, discard it. The U.S. EPA has flagged CCA for residential animal-contact applications, and the risk to developing nestlings is real.
Materials that work well
- Untreated solid cedar, pine, fir, or oak from old furniture, shelving, or barn boards (check for CCA first)
- Exterior-grade plywood scraps (at least 3/4 inch thick; thinner sheets warp and delaminate)
- Reclaimed hardwood flooring (often already 3/4 inch thick and very durable)
- Old wooden pallets made from untreated hardwood (many are heat-treated HT, not chemical-treated — look for the HT stamp on the pallet end grain)
Materials to avoid
- CCA or ACQ pressure-treated lumber (green tint, chemical smell, heavy for its size)
- Plywood thinner than 1/2 inch — it won't hold screws well and warps quickly
- MDF or particleboard — both swell and disintegrate in moisture
- Plastic containers (margarine tubs, milk jugs) — they overheat dangerously in summer sun
- Metal cans — extreme thermal cycling and condensation, no insulation
- Any wood with paint or finish on surfaces that will be interior to the box
The construction steps for a recycled-material box are identical to the cedar build above. The only extra step is milling salvaged boards to 3/4-inch thickness if they vary, and sanding off any surface finish before assembly. A recycled build pairs well with a hardware-cloth predator cone made from leftover 1/2-inch mesh. If you're thinking more broadly about creative builds, a guide to out-of-waste bird house projects covers additional material options and design variations that go beyond standard box shapes.
Quick troubleshooting checklist
If your box sits empty season after season, run through this checklist before redesigning. Most problems have a straightforward fix.
| Problem | Likely Cause | Fix |
|---|---|---|
| Box ignored all season | Wrong habitat for target species, or installed too late | Move box, add perch-free entrance, install by February next year |
| House Sparrows or Starlings taking over | Hole too large, or box near feeders/buildings | Reduce hole to ≤1 1/8 in (excludes starlings; reduces sparrows), relocate away from structures |
| Nest started but abandoned | Predator disturbance or interior overheating | Add deep entrance block; check ventilation gaps; re-orient away from west-facing sun |
| Wet interior after rain | No drainage holes, or roof overhang too small | Drill 4x 1/4-in floor holes; extend roof overhang to 1 in minimum |
| Chicks not fledging (high mortality) | Parasites from old nesting material | Clean box between clutches; scrub with 10% bleach; rinse and dry fully |
| Suction cups failing mid-season | Box too heavy or cups degraded by UV | Add windowsill ledge support; replace cups annually; switch to bracket mount |
| Raccoon predation | No predator guard on entrance or mounting | Add metal hole guard + deep entrance block; consider pole mount with stovepipe baffle |
Putting it all together
The best window bird house is the one that matches your target species, fits your mounting situation, and that you'll actually monitor and maintain through the season. For related information on selecting the best nest bird house for different species and settings, see our guide to choosing the best nest bird house. For most people in a suburban yard, a 3/4-inch cedar bracket box with a 1 1/8-inch wren or chickadee hole, mounted on the window frame at 6–8 feet, installed by early March, cleaned after each brood, and fitted with a metal hole guard will produce nesting birds within one to two seasons. If you have open yard space, pair it with a pole-mounted bluebird box and you've covered two of the most rewarding cavity-nester species in North American backyards. The builds here are genuinely beginner-accessible, the materials are inexpensive, and every box you put up correctly is a direct contribution to local bird populations, which is the whole point.
FAQ
What species-specific data should be included so readers can choose the ‘right box, right place’ for window bird houses?
Include a region-aware species list (local cavity nesters), recommended internal floor dimensions, interior depth, entrance-hole diameter (in mm and inches), preferred mounting height and habitat, and seasonal nesting phenology. Cite authoritative sources (Cornell Lab NestWatch/AllAboutBirds, state university extensions, BTO/RSPB for UK/EU). Provide acceptable tolerance ranges (±1/16–1/8 in) and note species overlap and competitors (house sparrows, European starlings).
What construction and material specifications are evidence-based and necessary for durable, bird-safe boxes?
Specify untreated, rot‑resistant wood (western red cedar, exterior-grade rough‑sawn pine, or 3/4" exterior plywood) with wall thickness ≈3/4" (18 mm). Require drainage holes, ventilation gaps, an overhanging roof, and a clean-out/inspection access (hinged side or removable panel). Recommend exterior-only water‑based paint/stain; never use CCA pressure-treated lumber. Include dimensions, cut lists, screw/fastener types (stainless or hot-dipped galvanized), and sealant locations (exterior only). Cite extension plans (OSU EC-1556, NRCS, state extensions).
What mounting methods and technical details must be covered for window-mounted vs. pole-mounted vs. interior-viewing boxes?
Describe suction-cup systems (maximum safe load, weather limits, regular inspection), exterior-bracket mounts (lag bolts into siding or bracket-to-masonry anchors), and interior viewing housings (double-wall box with external opening and interior viewing window). For pole mounts, detail pole type (smooth metal or PVC), recommended heights, distance from structures, and predator-baffle options (stovepipe or conical baffles). Include hardware specs, load limits, waterproofing and flashing, and illustrated mounting steps for common window types (double-hung, casement, sliding, brick).
What predator‑proofing and placement best practices should be included and supported with evidence?
Recommend keeping boxes away from branches or ledges predators can jump from, use smooth poles plus 4–6 ft tall baffles, position entrance holes at species-recommended heights, avoid perches, and keep box openings ≤species-specified sizes to exclude larger competitors. Advise predator guards on mounting surfaces and nest monitors for areas with cats or raccoons. Cite NestWatch/extension predator guidance and emphasize landscapes with low concealment for bluebirds and open areas for swallows versus brushy edges for wrens and chickadees.
What sanitation and maintenance protocols are required and why?
Provide an annual clean-out schedule: after breeding season (late summer/early fall) and optional mid‑winter checks; remove old nest material, disinfect with 10% bleach solution or commercial avian-safe disinfectant, rinse and dry thoroughly. Inspect for rot, loose fasteners, predator damage, and repair before the next season. Record sanitary precautions (gloves, avoid disturbing active nests) and legal limits on nest disturbance (see legal/ethical guidance). Cite NestWatch and extension sanitation recommendations.
What legal and ethical guidance must be included regarding monitoring and camera use?
Explain general legal/ethical rules: do not disturb or remove active nests without appropriate permits, follow local/state/federal migratory bird protections (Migratory Bird Treaty Act in U.S.), and obtain permits for research/filming if required. For cameras: avoid intrusive placement, limit monitoring frequency to prevent abandonment risk, mask or hide cabling to reduce predation risk, and ensure power/electronics do not overheat the box. Recommend following institutional/agency guidelines for nest monitoring intensity.