
The best bird houses for UK gardens are well-ventilated, cleanable, made from untreated timber or woodcrete at least 15 mm thick, sized to the species you want to attract, and mounted facing north to north-east at 2–4 m above ground. That covers the core of it. Everything else in this guide is about making sure your box actually gets used, keeps chicks safe from the squirrels and corvids that cause most UK nest losses, and survives a British winter without warping into a damp wedge of rot.
Best Bird Houses UK: Top Picks, DIY Plans & Placement Guide

Maya Thompson
13 Aug 2026
Who this guide is for
I have written this for three types of reader: the gardener who wants to buy a ready-made box and just needs to know which design is worth the money; the beginner DIYer who wants to build something from scratch on a weekend; and the backyard birdkeeper who already has a few boxes up but wants to improve occupancy rates and nest survival. If you fall somewhere across all three, that is fine too. I have included buying criteria, a format comparison, a species-dimension table, a full DIY plan with a cut sheet, and maintenance advice, so you can use the sections that apply to you and skip what does not.
Why nest-box design, siting and maintenance actually matter
It is easy to assume that any box with a hole in it will do the job. In my experience, that is only true in gardens with very low predator pressure and ideal natural cover. Research published in Ibis (2026) using nest-camera data from British sites found that corvids, mustelids, grey squirrels, woodpeckers and even great spotted woodpeckers are responsible for a substantial proportion of UK nest losses, and that the identity of the main predator varies by site. That matters because the mitigation that works against a squirrel (entrance-hole extender, deeper chamber) is not the same as what deters a weasel (a baffle on the post) or a crow (a deeper box with a narrower hole). Getting the design right from the start means you are not just providing accommodation; you are providing safe accommodation.
A 2024/2025 RSPB literature review confirmed that predator guards genuinely raise nest survival rates, and that combining multiple interventions (cone baffles, stovepipe baffles, metal entrance plates, entrance extenders) works better than any single measure alone. Woodcrete and WoodStone composite materials have also been shown in peer-reviewed work to resist hole enlargement by woodpeckers and squirrels better than plain timber, as well as providing better thermal buffering for chicks. None of this means you need to spend a fortune, but it does mean the design decisions you make before you mount the box are more important than the price tag.
On the maintenance side, BTO and RSPB both recommend cleaning boxes each autumn, ideally between September and October. Old nesting material can harbour parasites such as the fleas of the genus Ceratophyllus that will deter birds the following spring. A box that cannot be opened easily is a box that will not get cleaned, so cleanable design is not a luxury feature; it is the reason occupied boxes stay occupied year after year.
Quick buying criteria for UK conditions
Before you buy or build anything, run through this checklist. It is based on BTO and RSPB design standards and saves you from the most common mistakes.
- Wall thickness: minimum 15 mm, ideally 15–18 mm. Thinner wood provides poor insulation and warps or splits faster in UK freeze-thaw cycles.
- Internal floor area: at least 130 cm² (roughly 11×12 cm). Smaller chambers are cramped for most UK tit broods.
- Drainage: two or more 6 mm holes in the floor, or a slightly recessed floor, so pooled rain cannot drown chicks.
- Ventilation: small gaps at the top of the side walls or under the roof overhang prevent overheating in warm spells.
- Cleaning access: a hinged or sliding roof, or a hinged side panel secured by a screw or pivot nail. Boxes without an opening panel are very difficult to clean properly.
- No perch below the entrance hole. Perches give predators and dominant birds a staging post; BTO and RSPB both advise leaving them off.
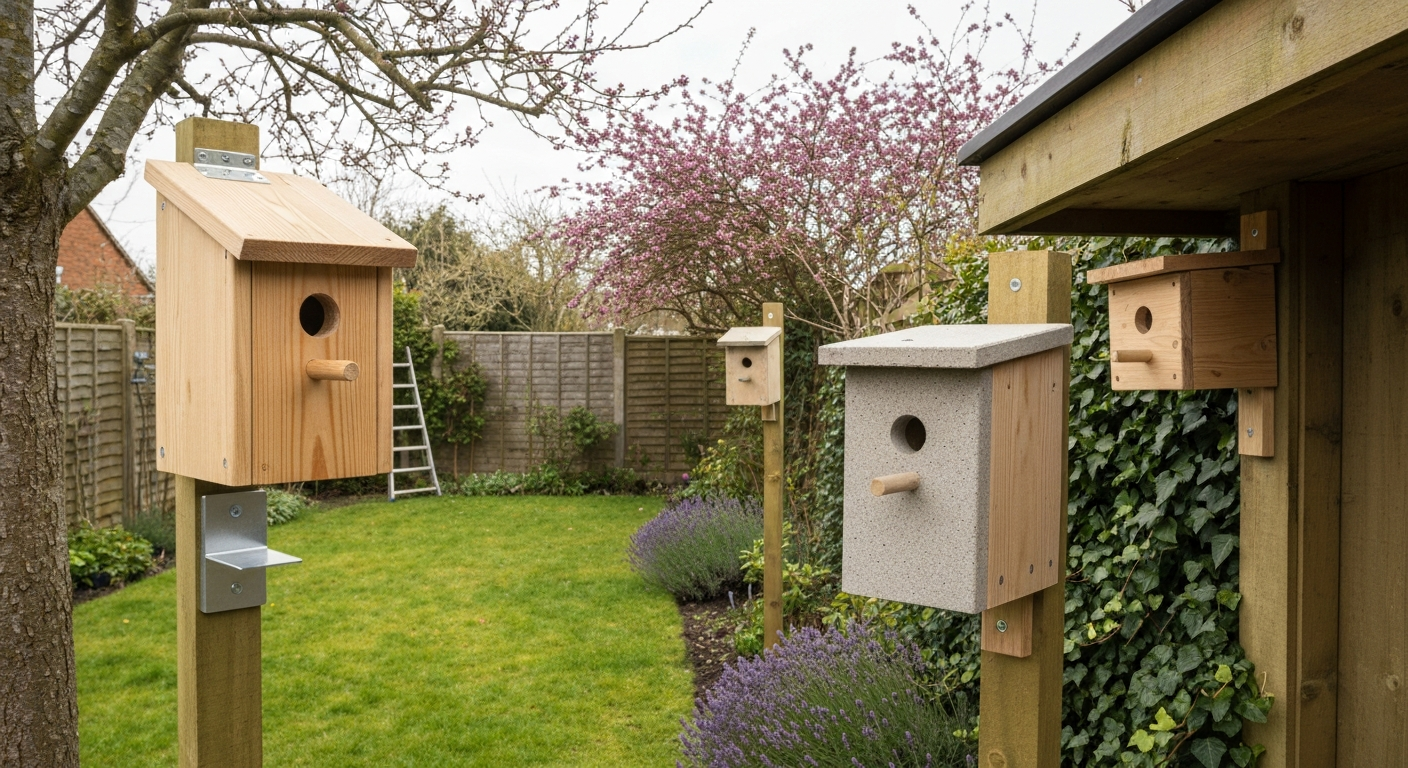
- Predator protection: a metal entrance-plate or hardwood-block extender (at least 38 mm deep) resists gnawing and enlargement. A baffle on the post or bracket adds a second layer of protection.
- Timber: untreated hardwood (oak, beech) or exterior-grade softwood (western red cedar, untreated Scots pine). FSC-certified where possible. Never pressure-treated timber inside or around the entrance, as preservatives can be toxic to birds.
- External finish only: water-based non-toxic wood treatment or exterior paint may be applied to the outside surfaces only; never the interior walls, floor, or entrance lip.
- Roof overhang: at least 50 mm at the front to shed rain away from the entrance hole.
- Legal note: all wild birds, their nests and eggs are protected under the Wildlife and Countryside Act 1981. Never disturb an active nest. Boxes should be put up before the breeding season begins; autumn installation (September to November) is ideal because birds will investigate boxes during winter roosting.
- Seasonal note: the BTO recommends checking and cleaning boxes between late August and October, after fledglings have left but before birds start using boxes as winter roosts.
Comparing the main types of bird house available in the UK
The UK market broadly divides into five categories. Here is how they stack up against each other in practice.
| Type | Best for | Pros | Cons | Typical UK price |
|---|---|---|---|---|
| Ready-made timber box | Quick setup, beginners | Immediately usable, wide species range, easy to find | Quality varies; cheaper models often under 15 mm thick | £11–£35 |
| Woodcrete / WoodStone composite | Long-term use, conservation gardens | Superior durability, thermal buffering, resists gnawing, multi-year guarantee | Heavier, more expensive, fewer stockists | £35–£80+ |
| Flat-pack kit | Families, beginners wanting a build project | Low cost, teaches construction basics, pre-cut parts | Assembly quality matters; thin wood common in budget kits | £17–£25 |
| Hanging bird house | Gardens without suitable walls or fence posts | Flexible placement, suits wrens and tits in cover | Swinging deters some species; harder to baffle against predators | £12–£30 |
| Multi-compartment terrace / sparrow terrace | House sparrows, tree sparrows | Mimics colonial nesting, good for sparrow colonies | Requires more space; one mite infestation can affect all compartments | £25–£70 |
| Specialist box (owl, swift, treecreeper) | Target species in suitable habitat | Optimised dimensions and entrance sizes for specific birds | Only useful if target species present; higher cost | £40–£300+ |
My recommendation for most UK gardeners starting out is a ready-made timber box from a reputable wildlife retailer (CJ Wildlife, Vivara, NHBS, Ark Wildlife, RSPB Shop) with walls at least 15 mm thick and a hinged roof. If budget allows, woodcrete models such as the Schwegler 1B, which has an internal chamber diameter of around 120 mm and is available with entrance holes from 26 mm to 32 mm, represent the best long-term value per year of service. For families with children who want a weekend project, a quality flat-pack kit with pre-cut parts and printed instructions is an excellent entry point and keeps the costs around £17–£25. For vetted options, see our guide to the best bird house kits.
Choosing the right style: outdoor, high-quality, best-selling, hanging and wren boxes
Outdoor bird houses intended for year-round UK exposure need to be built or treated to handle sustained rainfall, frost, and UV exposure. Exterior-grade plywood or western red cedar are the most reliable timber choices. If you are shopping for an outdoor box specifically, prioritise roof overhang and drainage holes over decorative detailing, which tends to trap moisture. For comparisons and buying recommendations, see our guide to the best outdoor bird houses.
High-quality bird houses in the UK context generally means woodcrete composites or thick-walled hardwood boxes with metal entrance reinforcement and manufacturer guarantees. The blank" rel="noopener noreferrer">Schwegler 1B is the most widely cited example in UK conservation projects and is available from specialist wildlife retailers. It is heavier and more expensive than a standard timber box but realistically lasts decades rather than years.
Best-selling boxes in the UK market tend to cluster around the standard 32 mm hole, tit-box form factor in untreated pine or FSC softwood, priced between £11 and £20. These sell well because they work for the widest range of common garden species. If you see a box at this price point, check the wall thickness before buying; some budget models use 10–12 mm timber, which is below the BTO minimum recommendation.
Hanging bird houses suit wrens, which naturally nest in dense ivy, bramble or log piles and tend to investigate swinging, sheltered spots. A hanging box placed in dense evergreen cover at 1–2 m height will attract wrens far more reliably than a box screwed to a sunny fence. For wren-specific boxes, an entrance hole of 28–32 mm works well; wrens are small but the hole does not need to be tiny because their priority is dense vegetative cover around the box rather than a restrictive entrance. If you want to go further into wren-specific designs, that topic is worth exploring in its own right. For detailed wren-specific designs, dimensions and siting tips, see our guide to the best wren bird houses.
Which box suits which UK garden bird
Getting the entrance hole right is probably the single most effective thing you can do to target a specific species. The BTO recommends a 32 mm entrance hole as the ideal size for most small hole‑nesting UK garden birds (use 28 mm to restrict to blue tits/coal tits) The BTO recommends a 32 mm entrance hole as the ideal size for most small hole‑nesting UK garden birds (use 28 mm to restrict to blue tits/coal tits).. A hole that is 2 mm too large lets in house sparrows that displace blue tits; a hole 4 mm too small and great tits cannot enter. The table below summarises the main hole-nesting species you are likely to attract in a UK garden.
| Species | Entrance hole diameter | Box type | Mounting height | Facing direction |
|---|---|---|---|---|
| Blue tit | 25–28 mm | Small closed-front box | 2–4 m | N to NE |
| Coal tit | 25–28 mm | Small closed-front box, lower siting | 1–2 m (in conifers) | N to NE |
| Great tit | 28 mm | Small closed-front box | 2–4 m | N to NE |
| Tree sparrow | 28 mm | Small closed-front box or terrace | 2–4 m | N to NE |
| House sparrow | 32 mm | Small/medium closed-front box or sparrow terrace | 2–4 m under eaves | N to NE |
| Nuthatch | 32 mm | Closed-front box (may plaster entrance with mud) | 2–4 m on trunk | N to NE |
| Starling | 45 mm | Larger closed-front box | 3–5 m | N to NE |
| Robin | Open-fronted (50 mm high opening) | Open-fronted box in dense cover | 1–2 m | Any, avoid S/SE sun |
| Wren | 28–32 mm or open-fronted in cover | Small hanging or open-fronted in dense ivy/bramble | 1–2 m | Any in dense cover |
| Tawny owl | Open-fronted / large oval (130–150 mm) | Large open-fronted or deep tube box | 3–5 m on trunk | Away from prevailing wind |
| Barn owl (tree box) | Square entrance 130×130 mm (min 100×100 mm) | Large deep chamber, floor ≥0.16 m², depth ≥450 mm | 3–5 m | Away from prevailing rain |
A quick note on Barn owls: the Barn Owl Trust specifies that the floor area of a nest chamber should be between 0.2 and 0.4 m² with an absolute minimum of 0.16 m², and the depth from entrance to floor must be at least 450 mm so fledglings do not fall out prematurely. This is a very different scale from a small tit box, so I would encourage anyone planning a barn owl project to treat that as a separate specialist undertaking with its own site survey requirements.
Tools, materials and safety checklist for DIY nest boxes
Materials shopping list
- Timber: one length of untreated FSC softwood (Scots pine, spruce or western red cedar) or hardwood (oak, beech), 150 mm wide × 18 mm thick × at least 1.5 m long. This is enough for one standard small tit box with off-cuts. Avoid any timber labelled CCA, tanalised or pressure-treated.
- Screws: 35–45 mm exterior-grade (stainless steel or galvanised) screws, typically No. 8 or 4 mm gauge. At least 20 per box.
- Wood glue: waterproof exterior PVA or Titebond III for joint reinforcement.
- Hinge: one 25–38 mm brass or stainless steel butt hinge for the roof, plus one brass pivot nail or a single stainless screw to act as the lock.
- Metal entrance plate (optional but recommended): 32 mm pre-drilled steel or aluminium plate from a wildlife retailer, or a hardwood block at least 38 mm deep, to protect the entrance hole from gnawing.
- External wood treatment: one small tin of water-based, non-toxic exterior wood treatment or exterior water-based paint in a natural earth tone. Applied to outside surfaces only.
- Roof flashing (optional): a small strip of pond liner offcut or rubber roof flashing along the roof ridge to stop water ingress at the hinge gap.
Tools you will need
- Tape measure and pencil for marking cut lines.
- Tenon saw or circular saw for straight cuts. A mitre box helps keep cuts square if you are using a hand saw.
- Drill/driver with a range of bits: 6 mm twist bit for drainage and pilot holes, and a 25 mm, 28 mm or 32 mm flat bit or hole saw for the entrance hole.
- Countersink bit (optional but keeps screw heads flush and prevents splitting).
- Sandpaper: 80-grit and 120-grit for smoothing the entrance hole interior so birds are not snagged.
- Clamps (two G-clamps or bar clamps) for holding pieces while glue sets.
- Safety glasses and dust mask, especially when drilling the entrance hole in softwood.
- Paintbrush for applying external treatment.
One substitution worth noting: if you cannot source a hole saw in the exact size you need, a 28 mm flat bit is widely available from hardware shops and works well for blue and coal tit boxes. For a 32 mm hole, a 32 mm flat bit is straightforward to find. Do not use a jigsaw for the entrance hole; the result is rarely clean enough, and rough internal edges can injure birds. If you are working with children, use a cordless drill/driver at low speed and let an adult complete the hole-boring step.
DIY plan: small tit box for blue tits and coal tits
This plan produces a standard closed-front nest box with a 28 mm entrance hole, suitable for blue tits and coal tits. It follows BTO and RSPB guidance on internal dimensions, wall thickness and cleaning access. The build takes about two hours including drying time for wood glue, and the cut list works from a single length of 150 mm wide × 18 mm thick untreated softwood.
Cut sheet (all pieces from 150 mm × 18 mm board)
| Piece | Width (mm) | Length (mm) | Notes |
|---|---|---|---|
| Front panel | 150 | 230 | Entrance hole 28 mm diameter centred, 45 mm down from top edge |
| Back panel | 150 | 300 | Two 6 mm pilot holes at top for mounting screws |
| Base (floor) | 114 | 130 | Width reduced by 18 mm each side to sit inside front and back. Two 6 mm drainage holes drilled 20 mm from corners |
| Left side panel | 130 | 200 | Straight cut; top edge cut at 10° slope toward front to shed water |
| Right side panel | 130 | 200 | As left side, mirrored |
| Roof | 165 | 190 | Overhangs front by 50 mm; hinged to back panel at rear edge |
Internal floor area from this plan: 114 mm × 130 mm = 148 cm², which exceeds the BTO minimum of 130 cm². Internal depth from floor to bottom of entrance hole: approximately 150 mm, which allows birds to climb up to the hole without being immediately visible from outside.
Step-by-step assembly
- Mark and cut all six pieces according to the cut sheet. Mark the 10-degree slope on the top edge of both side panels before cutting; this slope sheds water off the roof and creates a snug fit under the hinged roof.
- Drill the entrance hole in the front panel. Measure 45 mm down from the top edge and mark the centre point. Use a 28 mm flat bit or hole saw. Drill from the front face through to the back in one steady motion. Sand the inside of the hole smooth with folded 120-grit sandpaper.
- Drill two 6 mm drainage holes in the base, 20 mm in from each back corner.
- Assemble the two side panels onto the base first. Apply a thin bead of waterproof PVA to the edge of the base, clamp the side panel in place, and drive two 40 mm screws through the side panel into the base edge. Repeat for the other side. Allow glue to tack for 10 minutes before releasing clamps.
- Attach the back panel. The back is taller than the sides (300 mm versus 200 mm), so it protrudes 50 mm above the side panels and 50 mm below the base. The lower 50 mm forms a drip ledge; the upper 50 mm is where the mounting screws go. Glue and screw the back panel to the rear edges of the side panels and base (two screws per joint).
- Attach the front panel. It should sit flush with the front edges of the side panels. Glue and screw in place with two screws per side panel edge.
- Attach the roof. Lay the roof piece on top of the box so it overhangs the front by 50 mm and is flush with the back. Mark the hinge position on the underside of the roof and the top of the back panel. Screw the hinge in place on the back edge of the roof and back panel. The roof should now swing open and closed cleanly.
- Add the locking mechanism. Drive a single brass pivot nail or stainless screw through the roof overhang on one side so it can be rotated to hold the roof down. This prevents the roof from opening in wind but is easy to release for cleaning.
- Sand all external edges lightly with 80-grit paper to remove splinters. Apply two coats of water-based exterior wood treatment to all external surfaces only. Do not treat the interior, the inside of the entrance hole, or the entrance lip. Allow to dry fully (at least 24 hours) before mounting.
- Optional predator protection: if squirrels or woodpeckers are a known issue in your garden, screw a pre-drilled 38 mm hardwood block or a steel entrance plate over the entrance hole, centred on the 28 mm hole. This makes hole enlargement nearly impossible.
Mounting and placement
Mount the box by driving two 60–70 mm stainless screws through the pilot holes in the upper back panel into a tree trunk or fence post. Face the entrance hole between north and north-east to avoid direct afternoon sun and prevailing south-westerly rain. Height should be 2–4 m above ground, ideally with clear, unobstructed flight approach of about 1 m below the hole. Keep it away from bird feeders; feeding activity near a nest box causes stress and can attract corvids. If cats or rats are a concern, fit a cone-shaped metal baffle on the mounting post below the box.
Cleaning and annual maintenance
Each autumn, ideally in September or October after fledglings have left, open the hinged roof and remove all old nesting material wearing gloves and a dust mask. Scrub the interior with a stiff brush and hot water only (no detergents or disinfectants that leave residue). Allow to dry completely before closing. Check the entrance hole for signs of gnawing; if it has been enlarged beyond your target species' hole size, fit a metal plate before spring. Reapply external wood treatment every two to three years or when the surface looks weathered. RSPB Make a nestbox activity sheet (PDF) advises treating or painting only the outside with non‑toxic water‑based products and not coating the interior or the entrance lip RSPB Make a nestbox activity sheet (PDF) advises treating or painting only the outside with non‑toxic water‑based products and not coating the interior or the entrance lip.. A box maintained this way should last a decade or more.
A brief note on buying and selling nest boxes in the UK
If you are interested in the commercial side of nest boxes, whether sourcing kits to sell, making batches to sell at local markets, or pricing your own builds, the UK market gives you a useful reference range. For practical tips on pricing, marketing and legal basics, see our guide on how to sell bird houses. Standard timber tit boxes retail at roughly £11–£35; flat-pack kits at £17–£25; WoodStone composite boxes at £35–£80 or more; and specialist owl boxes at £100–£300. If you are building to sell, material costs for a single small tit box from FSC softwood come to roughly £3–£6, so there is reasonable margin at the lower end of the retail market. Presentation matters: boxes with clean joinery, a proper hinge and a metal entrance plate command higher prices and are easier to sell to wildlife-conscious buyers. Retailers including CJ Wildlife, Vivara, NHBS, Ark Wildlife and the RSPB Shop are worth studying for current pricing, packaging and specification language if you are setting up a small supply operation.
FAQ
Which authoritative organisations should I cite for UK nestbox design, species guidance and placement recommendations?
Use primary UK conservation bodies with species‑specific, practical guidance: British Trust for Ornithology (BTO) for hole sizes, internal areas and downloadable DIY plans; Royal Society for the Protection of Birds (RSPB) for build instructions, placement/timing and species notes; Barn Owl Trust for barn‑owl box specifications. Cite specific pages (e.g., BTO nestbox buying/make pages, RSPB build/activity pages, Barn Owl Trust box specs).
What peer‑reviewed literature and reviews are needed to support claims about materials, longevity and predator effects?
Include peer‑reviewed studies and recent meta‑analyses that test nestbox materials (timber vs woodcrete/WoodStone), construction effects on occupancy/breeding success, and predator identity/mitigation efficacy. Examples: comparative nestbox construction studies (journal articles on occupancy/thermal buffering), and the Ibis meta‑analysis / RSPB literature review on predators and guard interventions. Use these to justify material choices and predator‑proofing recommendations.
Which practical, evidence‑based DIY plans and dimensional standards should be referenced for species‑appropriate boxes?
Reference BTO and RSPB downloadable cutting plans and species‑specific dimensions (internal floor areas, chamber depth, and recommended entrance‑hole diameters). For large/targeted species, cite Barn Owl Trust dimensions. Use these authoritative plans as the baseline for all step‑by‑step instructions and cut lists.
What commercial/market sources are useful for pricing, product comparisons and kit availability?
Survey UK retailers (Vivara/CJ Wildlife, NHBS, Ark Wildlife, Wildcare, RSPB Shop) and manufacturer specs (Schwegler, Vivara WoodStone) to compile retail price ranges, warranties, and model specs. Use product pages to verify external/internal dimensions, available hole sizes, material claims and price bands for ready‑made boxes and kits.
What standards or guidance should I use for recommended materials, finishes and safety?
Rely on RSPB/BTO guidance: timber thickness ~15–18 mm, avoid pressure‑treated wood inside, exterior‑only non‑toxic water‑based paints/stains, no internal coatings, and avoid perches. Use manufacturer guidance for woodcrete/WoodStone care. Cite specific NGO pages that state these precautions.
Which sources support predator‑proofing and mounting recommendations?
Cite experimental evidence and reviews (RSPB literature review, the Ibis meta‑analysis) showing which predator guards (baffles, entrance extenders, metal plates) and mounting strategies reduce nest loss. Combine these with practical placement guidance from RSPB/BTO (recommended heights, aspect, distance from feeders) for site‑specific advice.
Next Articles
Best Selling Bird Houses: Practical Guide for Backyard DIY
Best selling bird houses: evidence-based picks, DIY plans, species dimensions, mounting, predator-proofing, selling tips
Best Bird House Kits: Top Picks, Sizes, Build & Mounting
Find the best bird house kits with species-appropriate sizes, assembly steps, mounting tips, and predator-proofing.
Best Wren Bird Houses: How to Choose, Build, and Install
Choose and build the best wren bird houses with correct hole size, dimensions, placement, predator-proofing, and cleanin